 |
|
 |
 |
|
 |
|
|
Starting Cross Platform Development
This topic will attempt to give you insight into the process of developing for the iPAQ. This includes sample commands and configurations which will probably be useful if you want to develop your own software or experiment with the internals of the Software Reference Platform.
Introduction to the Development
Process
Developing software on the iPAQ is quite
easy with the QNX software development tool chain. If you have installed
the QNX Realtime Platform or purchased the QNX development environment
for Microsoft Windows, you will likely use PhAB, the Photon Application
Builder. If you have purchased the QNX development environment for Sun
Solaris, at the time of this release, you will not have access to PhAB.
As a result, we strongly recommend that you install the QNX Realtime Platform
(QNX RTP) for the latest version of our graphical development environment.
The remainder of this document will assume you have installed QNX RTP.
One of major benefits of the QNX RTP is the notion of self hosted development. What this means is that you can write code and test it on your PC before moving it to an embedded device. Of course, there are many circumstances where you may need to access the hardware or system software on your embedded device. In these instances, you will need to compile your software specifically for the processor of your remote device, potentially transfer the software to the device and then execute the code. This process is known as cross platform development.
This document will start you on your way for both self hosted and cross platform development, targeting the iPAQ's hardware. After you have finished with this document, please continue reading the iPAQ application developer guide to learn how properly write and install your software.
Part 1: Installing armle Packages
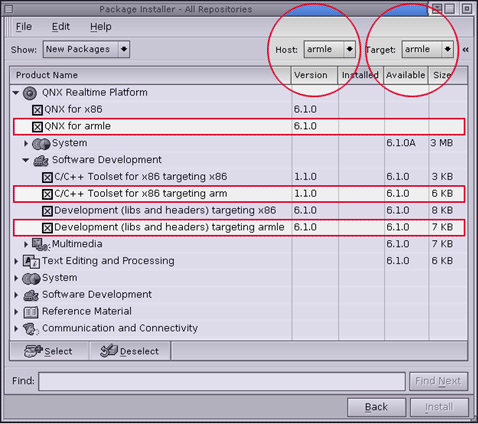
If you are working in the Windows or Solaris development environments, these packages are already installed on you PC. Otherwise you'll need to launch the Package Installer and connect to the WWW Repository. If you have a burned QNX RTP ISO image you may connect to the CD Repository with your QNX CD insert in the CD-ROM drive.
Once connected,
you will need to change the Package Installer's repository view to show
armle packages. Host packages have binaries which run on an armle
device, like the iPAQ. Target packages contain files needed to develop
code for an armle device.
Install the
following packages, or the most up to date equivalent of these packages:
 |
|
|
Part 2: Starting a Project
Note: We assume that you know how to do basic editing of text files through the course of this documentation. The QNX Realtime Platform ships with vi and a graphical editor, ped. If you are more familiar with contemporary UNIX editors, we recommend downloading Jed or Vim. Vim is a much improved replacement for vi which includes syntax highlighting and remote shell commands. Jed is a lightweight clone of Emacs with almost all of its features including syntax highlighting, auto completion, remote shell commands and tracking of compiler errors. Both editors support graphical versions, xjed requires the XPhoton server packages to be installed.
Graphical Applications
If you are developing graphical applications, you will be using the Photon Application Builder (PhAB). Your project directory will be created automatically by PhAB as will a number of other sub directories, data files and automatically generated code.
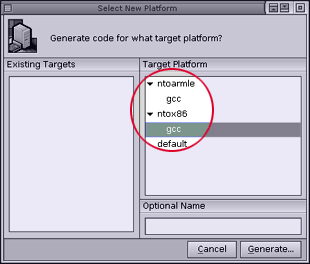
1. Your first task is to create and save your project. This will create a directory which will hold all of your source code, object files and executables. We recommend that you save frequently to avoid losing your work. This release of PhAB is relatively stable, but there are still crashing bugs which we're aggressively working on fixing.2. Once you have saved your project, you can activate the Build & Run Dialog and tell PhAB about your target processors. Generate a target platform for both x86 and armle. This will let you test your programs on your PC and move them over to the iPAQ when you're ready.
 |
 |
|
|
|
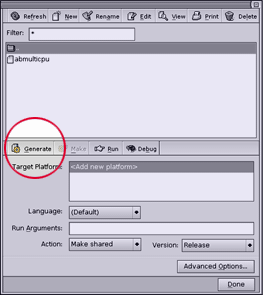
3. Now that you have told PhAB what platforms you developing on, you can return to the Build & Run dialog and generate for each target. The first time you click Generate, PhAB will create the structure within your project. Subsequently, it will generate any user interface databases, automatically create code, header files and function stubs, as needed.4. Once you have generated for the first time, the following directory structure is created:
project The project directory. project/wgt The user interface (widget) database directory. project/src The source directory, where your source code should go. project/src/gcc_ntox86 The x86 object directory, for your .o files and application. project/src/gcc_armle The armle object directory, for your .o files and application.
You now have a basic project
set up. Hopefully you have a general understanding of why you did these
steps and what resulted. You can now begin developing graphical applications
for your iPAQ.
Non Graphical Applications
If you are developing a non graphical application such as resource manager, background process, or driver, you probably won't be using PhAB. Instead, you'll want to create a directory structure using the QNX Makefile architecture. There are many features and benefits to using QNX's recursive Makefiles; this section presents a brief tutorial on creating a basic project. We encourage you to read more out about our Makefile and project environment in our standard documentation.
QNX development projects which are not generated by PhAB build their applications in a more generic manner. There are many details, options and features but what we will cover here are the basics of building a single binary.
Following in the tradition of all good samples let's begin with the basics of "Hello World":
| Make a directory for your project:
$HOME/cvs/hello
Inside the project directory make two files: hello.c and hello.use Create the hello.use file with the text:
Create the hello.c file with the text:
|
To allow for the development of x86, before any other processors:
| Use this command
to create initial makefiles, x86 development files: addvariant
-i CPU x86 o
Use this command to compile for x86: CPULIST=x86 make |
Take a moment to look in your project directory. Notice the two files it created: common.mk and Makefile.
To allow development for iPAQ
after the inital makefiles are created:
| Let's assume
we have already run addvarient with a -i; the initial makefiles are already
present.
Use this command to create the armle development files: addvariant arm le Use this command to compile for the iPAQ: CPULIST=arm make |
As a result of these basic steps, you may use the CPULIST environment variable to target different processors. As we mentioned earlier, many other cross platform development features exist in using the common.mk and addvarient files and utilities. We encourage you to read more about this in our standard documentation.
Part 3: Basic User Interface Guidelines
Start your projects by adding a
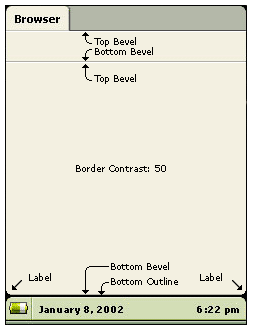
pane with the following basic flags: Pt_FLAT_FILL, Pt_TOP_BEVEL and Pt_BOTTOM_OUTLINE.
If you want something which looks like a toolbar, stack another pane on
top of this one with the following basic flags: Pt_FLAT_FILL, Pt_TOP_BEVEL_BOTTOM_BEVEL.
Make sure both of these have a Border Contrast of 50. Without this value,
the bevelling may be too light to be seen on the bright iPAQ display. Yellow
fill color, used by the tab is: R: 246, G: 240, B: 226. In the future,
the tab will adopt the color of the window, but at this time it doesn't.
Try and select a desaturated pastel for your panel fill colors.
 |
If you look closely, the corners
of many applications are rounded by adding a labels with small black fills.
These are just drawn in the labels, with transparency.
 |
|
|