 |
|
 |
|
|
|
|
|
iPAQ User's Guide
This is a basic user's guide. It explains the applications and user interface on the QNX iPAQ Software Reference Platform. This also explains the ideas behind the service bar, the application control buttons and the input system for defining data.
The iPAQ Hardware
With this release of the Reference
Platform many of the buttons and lights are unused. The support will expand
as updates and supplementary applications are released.
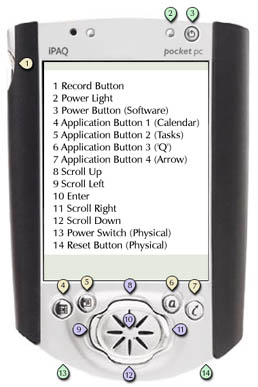
You may need to use the physical power switch found on the underside of the device: with the stylus, slide open the small panel protecting the switch and gently push the switch right-to-left to turn it off. Be careful not to force the switch; it is not a durable component and has been known to break when it is carelessly forced in the wrong direction. The primary power button should work in this release, but does not support full power management. This mean you may lose any data which hasn't been saved. The device will be essentially turned off. The bottom buttons, eight through twelve, act as the arrow keys on a standard keyboard. By pressing the center of the directional pad, you may emit a selection event, used by some applications. Please note that these controls may be interpreted differently by each application. The application buttons are unused at this time. In the future these will likely be programmable launch buttons, used to start your preferred application. This release does not attempt to include Personal Information Management (PIM) applications, so the Calendar and Task buttons don't have anything to launch. Finally, the record button on the side of the iPAQ is unused. We have voice recording for internal demonstrations, but regrettably, we haven't yet released this aspect of our media architecture. |
Starting The iPAQ
 On
startup, the iPAQ will wait until the user presses a button other than
the calendar button. This gives developers a chance to plug in their serial
cables and talk to the device before it begins booting. Most users will
want to immediately a button and let the iPAQ boot the QNX image. On
startup, the iPAQ will wait until the user presses a button other than
the calendar button. This gives developers a chance to plug in their serial
cables and talk to the device before it begins booting. Most users will
want to immediately a button and let the iPAQ boot the QNX image.
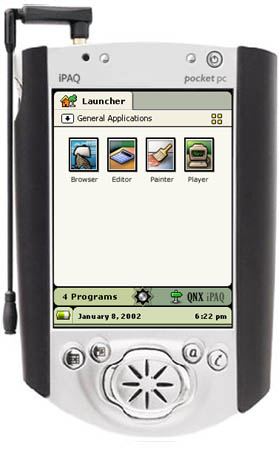
The iPAQ touch screen display must be recalibrated when you first start your device. We have found that the hardware often requires recalibration after the device warms up or is used for a period of time. We have tried our best to offer you high quality touch screen interactivity - feel free to recalibrate if your stylus does not feel accurate. Once you have recalibrated your display,
the iPAQ should show you a launcher with the installed applications. In
the top right hand corner, a small grid represents the view - small or
large icon. The top left hand corner is a drop down list to filter your
applications. Launch an application by clicking on the icon or the text.
|
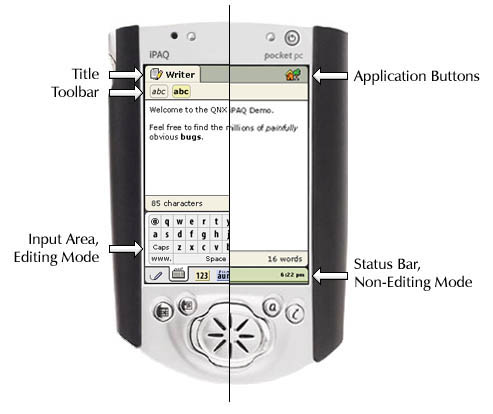
Anatomy of a Basic Application
iPAQ Applications are general modal: you run
one application at a time. When you switch between one application and
another, all of your state should be preserved. This means that
whatever you are working on is automatically saved, and the program should
resume where you last left it.
Note: The demonstration applications don't preserve state at this time. Future releases will provide source example which are implemented correctly. (Do as we say, not as we do.)Each application has a similar title area in the top-left corner. The upper-right corner is reservred for buttons used to control the visible application. When you launch your program, you may see a virtual keyboard on the bottom of the screen, or you may see a status bar. The input area appears whenever you have selected an editable area. If has disappeared and you need to call it up again, click on the status bar and click on the are you want to edit.
 The
application buttons change to reflect the features supported by the active
application. For example, rotating an application requires that the application
was designed with two different layouts. Similarly, not all applications
have help or about dialogs. The
application buttons change to reflect the features supported by the active
application. For example, rotating an application requires that the application
was designed with two different layouts. Similarly, not all applications
have help or about dialogs. |
You may not see every one of these buttons on the version of the iPAQ Reference Platform you have installed, but in case of upgrade, here is an overview of what each button would do, if it is available:
The QNX Handheld Input System
The input system allows you to give relevant
information to an active application. It appears when you click on an control
which needs input. It is divided into two main areas, the input method
and the input region.
Think of the input area as a collection of tabbed cards. Each card will allow you to input particular types of data in a particular way. You may not see all of the types of input cards at any given moment. Each type represents a data type. For example, if you select a numeric input area, the number input card will become visible. If you select a color patch, a color input card would appear.
At this time only most of the demo applications only support the text input cards. There are several cards which help you input text. This includes a virtual keyboard, number pad and possibly handwriting recognition area. QNX support handwriting from a number of third part vendors. As our partners allow the public release of the Intel Strong ARM handwriting recognition for QNX, we will update our iPAQ image.
A sample of some of the possible input cards.
The Service Bar
 The
bottom of the iPAQ screen is shared by both the input area and small blue
service
bar. This area is reserved for system messages and the status of background
applications. In the initial release, the status bar will be mostly inactive.
The
bottom of the iPAQ screen is shared by both the input area and small blue
service
bar. This area is reserved for system messages and the status of background
applications. In the initial release, the status bar will be mostly inactive.
The icons on the left side of the bar reflect the state of the iPAQ or the status of background services. For example, when the iPAQ is plugged in, the connection is detected;, a plug appears; the battery icon reflects the strength of the battery's charge.
Summary
This document has presented the fundamental
ideas behind the iPAQ environment. We encourage you experiment and meet
with the QNX development community. Hopefully you will be inspired to use
the freely available QNX Realtime Platform to experiment with your own
applications and custom iPAQ operating system.
|
|